
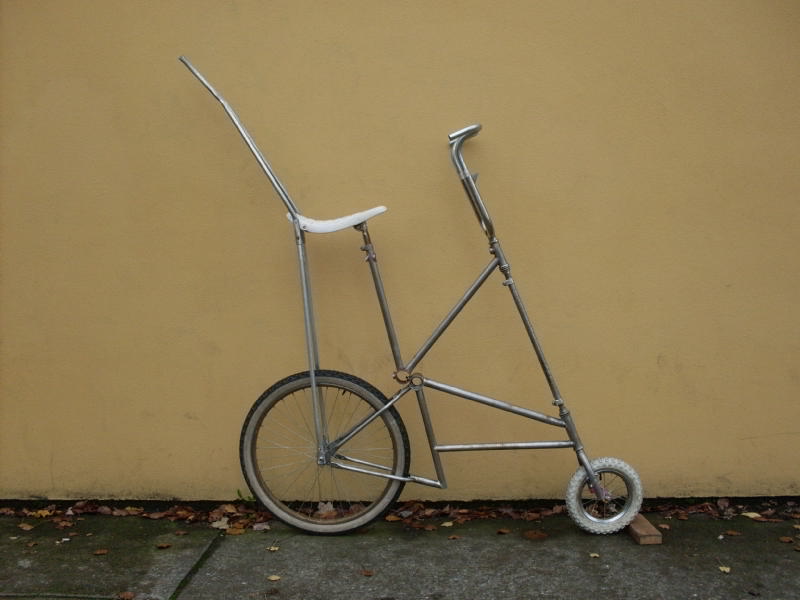
Okay folks, it's time for part C, I will be showing you how to get your seat situated properly AND how to make a BIG ol' pointy SISSY bar !!!! STEP ONE-Grab the seat and seat post you want to use and put them on the bike.Now adjust the seat height. Yer probably thinkin' " how can I do dat without sittin' on it !! ". Here's HOW !!!! I have other bikes that have banana  seats that are already adjusted to fit me,maybe you do too !!! I discovered that when measuring from the center of the bottom bracket to the hole in the seat where the sissy bar attaches, all of them came out to 29" !!!!! I also found out a way to do this with regular seats,just measure from the center of the bottom bracket to the bottom of your seat post clamp on your seat. Mine always came out to 24 1/2",see what I'm sayin' !!!!! These measurements are VERY important because you want to be comfortble riding the finished bike,with proper leg extension. So adjust your seat accordingly.STEP TWO-Now step back and look at the bike from the side. Does the back of the seat go past the center of the rear wheel ??? UH-OH !!!!!! Rule of thumb for ALL tallbike builds-ALWAYS MAKE SURE THE BACK OF THE SEAT IS AT OR IN FRONT OF THE CENTER OF THE REAR WHEEL !!!!!! If you don't address this problem while building,the finished bike will have a strong tendancy to tip over backwards,NOT GOOD !!! You wanna make a bike that is well balanced and a JOY to ride,NOT a barely rideable MONSTROSITY !!!!!!!!!!!! Some banana seats might be too long to use,this is why for this bike I am using a shorty seat from a kids 16" bike. STEP THREE- Remove your seat but leave the seat post, Find a pipe or chunk of frame tubing that fits over the seat post. Now while straddling the front of the bike,grab the pipe with both hands and gently pull it towards you.Make sure you pull it nice and straight !!!!!! Do this a little at a time,put your seat back on periodically to see where it is in relation to the center of the wheel. Once you have it in the right place move on to the next step. STEP FOUR-The sissy bar will be made from 3 pieces of 3/4" scrap electrical conduit,2 pieces of 3" long straight h-bar tubing,and 2 pieces of 4" long h-bar tubing.The handlebar tubing is used to strengthen the parts of the bar where the bolts are attached and to connect the 3 main pieces. Now measure from the rear axle to the sissy bar mounting hole in the seat. Add 1" to that figure.This will be your overall length for your side pieces. Cut 2 lengths of conduit to this size. Now take the 3" pieces of h-bar tubing ( the PINK chunks in the pictures ),cover the insides w/silicone and slide them over one end of each piece of conduit until they are flush. Now using a 1/4" drillbit drill holes near the top of the h-bar pieces and install bolts as shown. Next,measure 1 1/2" from the bottom and make a mark there. Using a hammer,flatten the tubing up to that mark. Next measure 3/4" from the bottom of the flat sections,make a mark there. Now ,using a 3/8" drillbit,drill holes at that mark.This is the bottom of your side pieces and will (for now ) be attached to the rear axle. STEP FIVE-Moving to the top of the side pieces,measure and mark at 2" AND 4". Cut the conduit off at the 2" mark. Now take the 4" pieces of h-bar tubing,coat the insides w/silicone,and slide them onto the conduit up tp the remaining mark. Now drill 1/4" holes near the bottom end of the h-bar pieces and attach bolts. STEP SIX- Now measure 1/4" down from the top and drill 1/4" holes making sure they are in line with the 3/8" holes on the other end. Install the completed side pieces,find some bolts that are long enough to attach the seat to these pieces. STEP SEVEN- Measure to see how high you want the sissy bar to be ABOVE the seat.Double that measurement and find a piece of conduit that length. Now bend that piece evenly in half. If you have access to a tubing bender,use that,if not just fold that puppy in half!!!! STEP EIGHT-Remove the bolts from the seat,put some silicone on the ends of your top piece,and slide both ends down into your side pieces. Using the existing holes as a guide,drill 1/4" holes through to the seat holes and re-attach the seat bolts.You may notice from the pictures that I redrilled the sissy bar mounting holes further back on the seat. This is to make is to make sure the back of yer BUTT is mostly resting on the seat NOT jammed up against the sissy bar !! Dat's VERY UNCOMFORTABLE !!!!! STEP NINE- You will now have to bend the top part of the sissy bar back at an angle. Grab the back of the seat and the top of the bar and slowly bend it back to the angle you want. Alrighty then,tighten everything down and yer DONE !!!! Check out that COOL LOOKIN' sissy bar you just made !!!!! I really dig the look of this style of sissy bar. It kinda looks like the type the Bay Area chopper builders were puttin' on there motorcycles back in the days when Sonny Barger was still a young feller !!!! Those were and still are some of the coolest things on wheels !!!!! Ed Roth did some great drawings of these bikes. I've got a little tip that might be helpful about adjusting banana seats. Yer butt rests in the lowest part of the dip in the seat. Understand what I'm sayin'!!!!! Adjust the nose of the seat up to move yer butt back,or adjust it down to move yer butt forward. If you adjust it too far down in the front you'll keep sliding towards the front while riding. That's REALLY uncomfortable AND annoying,just experiment with different adjustments until you find the right one for you. The first 2 photos in this post are of what the bike looked like after the steps in this part were finished. I removed all the paint ( READY TO RUST !!!!!!!!! ), put an extra bend in the sissy bar,AND put a longer upside down fork on the top frame.When building vehicles like this it is always best to make changes,or fix potential problems as you are building rather than afterward.Okay that's it for now,PART D will deal with making the backbone that ties the 2 frames together at the rear. Any questions,comments,critcisms ( positive or negative ) E-mail me at omahgarsh@gmail.com I'd love to hear what you have to say !!!!!!!!


 seats that are already adjusted to fit me,maybe you do too !!! I discovered that when measuring from the center of the bottom bracket to the hole in the seat where the sissy bar attaches, all of them came out to 29" !!!!! I also found out a way to do this with regular seats,just measure from the center of the bottom bracket to the bottom of your seat post clamp on your seat. Mine always came out to 24 1/2",see what I'm sayin' !!!!! These measurements are VERY important because you want to be comfortble riding the finished bike,with proper leg extension. So adjust your seat accordingly.STEP TWO-Now step back and look at the bike from the side. Does the back of the seat go past the center of the rear wheel ??? UH-OH !!!!!! Rule of thumb for ALL tallbike builds-ALWAYS MAKE SURE THE BACK OF THE SEAT IS AT OR IN FRONT OF THE CENTER OF THE REAR WHEEL !!!!!! If you don't address this problem while building,the finished bike will have a strong tendancy to tip over backwards,NOT GOOD !!! You wanna make a bike that is well balanced and a JOY to ride,NOT a barely rideable MONSTROSITY !!!!!!!!!!!! Some banana seats might be too long to use,this is why for this bike I am using a shorty seat from a kids 16" bike. STEP THREE- Remove your seat but leave the seat post, Find a pipe or chunk of frame tubing that fits over the seat post. Now while straddling the front of the bike,grab the pipe with both hands and gently pull it towards you.Make sure you pull it nice and straight !!!!!! Do this a little at a time,put your seat back on periodically to see where it is in relation to the center of the wheel. Once you have it in the right place move on to the next step. STEP FOUR-The sissy bar will be made from 3 pieces of 3/4" scrap electrical conduit,2 pieces of 3" long straight h-bar tubing,and 2 pieces of 4" long h-bar tubing.The handlebar tubing is used to strengthen the parts of the bar where the bolts are attached and to connect the 3 main pieces. Now measure from the rear axle to the sissy bar mounting hole in the seat. Add 1" to that figure.This will be your overall length for your side pieces. Cut 2 lengths of conduit to this size. Now take the 3" pieces of h-bar tubing ( the PINK chunks in the pictures ),cover the insides w/silicone and slide them over one end of each piece of conduit until they are flush. Now using a 1/4" drillbit drill holes near the top of the h-bar pieces and install bolts as shown. Next,measure 1 1/2" from the bottom and make a mark there. Using a hammer,flatten the tubing up to that mark. Next measure 3/4" from the bottom of the flat sections,make a mark there. Now ,using a 3/8" drillbit,drill holes at that mark.This is the bottom of your side pieces and will (for now ) be attached to the rear axle. STEP FIVE-Moving to the top of the side pieces,measure and mark at 2" AND 4". Cut the conduit off at the 2" mark. Now take the 4" pieces of h-bar tubing,coat the insides w/silicone,and slide them onto the conduit up tp the remaining mark. Now drill 1/4" holes near the bottom end of the h-bar pieces and attach bolts. STEP SIX- Now measure 1/4" down from the top and drill 1/4" holes making sure they are in line with the 3/8" holes on the other end. Install the completed side pieces,find some bolts that are long enough to attach the seat to these pieces. STEP SEVEN- Measure to see how high you want the sissy bar to be ABOVE the seat.Double that measurement and find a piece of conduit that length. Now bend that piece evenly in half. If you have access to a tubing bender,use that,if not just fold that puppy in half!!!! STEP EIGHT-Remove the bolts from the seat,put some silicone on the ends of your top piece,and slide both ends down into your side pieces. Using the existing holes as a guide,drill 1/4" holes through to the seat holes and re-attach the seat bolts.You may notice from the pictures that I redrilled the sissy bar mounting holes further back on the seat. This is to make is to make sure the back of yer BUTT is mostly resting on the seat NOT jammed up against the sissy bar !! Dat's VERY UNCOMFORTABLE !!!!! STEP NINE- You will now have to bend the top part of the sissy bar back at an angle. Grab the back of the seat and the top of the bar and slowly bend it back to the angle you want. Alrighty then,tighten everything down and yer DONE !!!! Check out that COOL LOOKIN' sissy bar you just made !!!!! I really dig the look of this style of sissy bar. It kinda looks like the type the Bay Area chopper builders were puttin' on there motorcycles back in the days when Sonny Barger was still a young feller !!!! Those were and still are some of the coolest things on wheels !!!!! Ed Roth did some great drawings of these bikes. I've got a little tip that might be helpful about adjusting banana seats. Yer butt rests in the lowest part of the dip in the seat. Understand what I'm sayin'!!!!! Adjust the nose of the seat up to move yer butt back,or adjust it down to move yer butt forward. If you adjust it too far down in the front you'll keep sliding towards the front while riding. That's REALLY uncomfortable AND annoying,just experiment with different adjustments until you find the right one for you. The first 2 photos in this post are of what the bike looked like after the steps in this part were finished. I removed all the paint ( READY TO RUST !!!!!!!!! ), put an extra bend in the sissy bar,AND put a longer upside down fork on the top frame.When building vehicles like this it is always best to make changes,or fix potential problems as you are building rather than afterward.Okay that's it for now,PART D will deal with making the backbone that ties the 2 frames together at the rear. Any questions,comments,critcisms ( positive or negative ) E-mail me at omahgarsh@gmail.com I'd love to hear what you have to say !!!!!!!!


No comments:
Post a Comment