
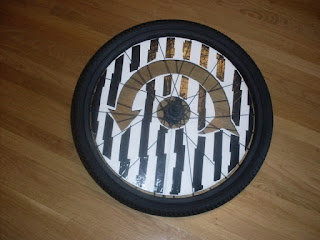
Before going through this procedure please read my previous post about wheel discs. This post is just to explain how I make mine,you might be able to use some of my ideas and add a few of your own to come up with something you like better. Well,here we go!!STEP ONE-find a couple of pieces of cardboard that are as big as your wheels. STEP TWO-get a piece of wood to make a scribing tool as pictured, the one I used is 13"x 1 1/4" x 1/8". Put a 2" sheetrock screw close to one end. Now measure from the screw to mark off these distances for the outside diameters of the discs. Measure and mark as follows-for 16" wheels:5 1/2" for 20":7 5/8" for 24":9 3/8" for 26":10 3/8". Now using a 3/8" drill bit, drill one hole at each one of your marks. Now mark off 1 ", 2 ", and 3" from the screw and using the same drill bit,drill holes at each of those marks. These are for the inner openings by the hubs of your wheels. Now get a Sharpie and push it through the appropriate hole for the size of wheels you're using STEP THREE-push the screw of your scribing tool into the center of the cardboard until the tip of the pen touches. Now rotate the pen around to make a full circle. Repeat this for the inside opening, to determine what size inner hole you need,measure the distance of the spokes where they first intersect from the hub to the axle center, double that figure, and make a center hole that's slightly larger ( don,t make them too small or the disc won't fit through the spokes!! ). The 1" mark on the tool makes a 2" center hole, the 2" mark makes a 4" center hole, get it? STEP FOUR- if you are going to cut out additional holes or patterns for artsy purposes, draw them in now. Also draw in a split line so you can thread the finished disc through the spokes. STEP FIVE-cut out all your circles, art patterns,and the split. I use an Xacto knife for this step. Also,using scissors cut an additional 1/8" from one side of the split, this compensates for the thickness of the sticker material. STEP SIX- decide which material you want for the basic or background color and cut it into 1"x1/2" pieces. Now apply those pieces around all the inside and outside edges overlapping each piece. STEP SEVEN- now fill in all the remaining area where the cardboard shows with random cut up pieces of your background material. STEP EIGHT- now put on any additional colors and shapes of stickers to finsh the look that you want. STEP NINE-take a hand held hair dryer ( set on high ), hold it close to the disc and the surfaces on both sides smoothing out the bumps and wrinkles with your fingers as you go. This shrinks and melts the sticker material to the cardboard and to itself,and it conforms to whatever shape it's in. DON"T BY-PASS THIS STEP!!!! If you do the sticker material will peel back and un-stick, this also seals everything up and makes it water proof. STEP TEN-take the finished disc and rotate it through the spokes starting at the opening where the air valve stem is. Keep feeding it around until the split comes back around to the valve stem again. STEP ELEVEN- put the wheels back on the bike,spin them and make sure the disc is centered. Then dab on 5 or 6 spots of silicone adhesive ( clear ) at the outer ends of the spokes where they touch the discs. YOUR DONE!!!!!! NOW GO OUT AND MAKE SPINNY SHADOWS ON THE STREETS!!!!!! WHEEL DISCS A GO-GO BABY!!!!!!!!!!!!!! Any questions,comments,criticisms ( positive or negative ) -E-mail me at omahgarsh@gmail.com -I'd love to hear what you have to say!!!!!!!


 holes or patterns for artsy purposes, draw them in now. Also draw in a split line so you can thread the finished disc through the spokes. STEP FIVE-cut out all your circles, art patterns,and the split. I use an Xacto knife for this step. Also,using scissors cut an additional 1/8" from one side of the split, this compensates for the thickness of the sticker material. STEP SIX- decide which material you want for the basic or background color and cut it into 1"x1/2" pieces. Now apply those pieces around all the inside and outside edges overlapping each piece. STEP SEVEN- now fill in all the remaining area where the cardboard shows with random cut up pieces of your background material. STEP EIGHT- now put on any additional colors and shapes of stickers to finsh the look that you want. STEP NINE-take a hand held hair dryer ( set on high ), hold it close to the disc and the surfaces on both sides smoothing out the bumps and wrinkles with your fingers as you go. This shrinks and melts the sticker material to the cardboard and to itself,and it conforms to whatever shape it's in. DON"T BY-PASS THIS STEP!!!! If you do the sticker material will peel back and un-stick, this also seals everything up and makes it water proof. STEP TEN-take the finished disc and rotate it through the spokes starting at the opening where the air valve stem is. Keep feeding it around until the split comes back around to the valve stem again. STEP ELEVEN- put the wheels back on the bike,spin them and make sure the disc is centered. Then dab on 5 or 6 spots of silicone adhesive ( clear ) at the outer ends of the spokes where they touch the discs. YOUR DONE!!!!!! NOW GO OUT AND MAKE SPINNY SHADOWS ON THE STREETS!!!!!! WHEEL DISCS A GO-GO BABY!!!!!!!!!!!!!! Any questions,comments,criticisms ( positive or negative ) -E-mail me at omahgarsh@gmail.com -I'd love to hear what you have to say!!!!!!!


No comments:
Post a Comment