Saturday, November 21, 2009

CHRISTMAS SPECIAL TALLBIKE SALE !!!!!!!!!!!!!!!!!!!!


Christmas is comin' fast !!! Do you have a silly cyclist in your family ??? Someone who loves tallbikes but doesn't have one yet ??!! Well you've come to the right place !!!! Starting RIGHT NOW and until December 24th these 2 jewels will be selling for $125 each OR $200 FOR BOTH !!! Can you believe it !!!! That's a STEAL for such stunningly beautiful AND well engineered hunks of rolling art such as these !!!!!!!! AND they even come in festive christmassy colors,how cool is that !!!! Step up or step back !!! NOW'S the time to get the coolest christmas gift you've EVER given !!!!! Even SANTA can't get THESE babies !!! GET'EM NOW WHILE THEY LAST !!!!!!!!!! Ya gotta come to PORTLAND,OREGON though,NO SHIPPY !!!!!!! E-mail me at omahgarsh@gmail.com or call 503-232-1131. Any questions,comments,criticisms ( positive or negative ) E-mail me at omahgarsh@gmail.com I'd love to hear what you have to say !!!!!!!!


EYECATCHA !!!!!!!!!!!!!!!! The one that started the bolt together revolution !!!!!!!!!!!

This is the EYECATCHA,this bike is the first of my bolt together steering wheel tallbikes that uses all the tricks I learned from my earlier attempts. Although it is kind of wild looking it is a very solid easily rideable machine. This bike is made from bike parts that other folks TRIED to throw away !! Huffy mountain bike frames,wheels + tires from cheapo MTBs and BMXs,handlebars,frame scraps,etc.,etc. It uses a 1-speed coaster brake rear hub w/26" rim + tire,it's geared low for slow cruisin' and E-Z take offs !!! The MONKEY TAIL was made from a cut off handlebar stem and dropdown bar chunks and some more frame scraps,it looks comical but is actually a useful gadget !! The EYEBALL is made from an old Schwinn generator taillight housing,a plastic green bloodshot eyeball from my goofy toys junkbox,and the eyelash is cut from a beer can.Check out that crazy cool offset kickstand mount ( if you want to keep yer tallbike upright when parked,there's no better way to go !!! ). I sold this bike a while back and I miss it. Oh well, I can always just build a clone if I feel like it because the individual parts are pretty common.Check out my previous posts for more about this and similar tallbikes. If you want to buy one OR build one,this is the place to come !!!!


Friday, November 20, 2009

BANANDEM !!!!!! a bolt together,multi-speed,banana seat tandem !!!!!!

This is a bolt together tandem that I built a few years back. I built it to take my wife to her bus stop and pick her up after work. She was working 2PM to 11PM at that time.We live in kind of a bad neighborhood,she was getting a little too much attention from the local lowlifes so we started biking to the bus stop together. We would ride 2 bikes and I would bring the other bike back with me after seeing her off at 1:30 and go get her at 11:30. I started drawing unwanted attention from the police because in this area of town when you see someone riding one bike while wheeling another alongside there's a good chance you're seeing a bike theft in progress !!!! So for me this was a PERFECT reason to build a tandem !! I didn't have access to a suitable workspace to weld one together ( unfortuneately STILL the situation NOW !!! ) so I decided to figure out a way to bolt one together. I had 2 BMX cheapo frames with nice looking curved tubing and a pair of 48 spoke 20" aluminum wheels,that was the start of the project. I thought that banana seats would work best to keep the seat height lower and hi-rise bars would do the trick here too. To join the 2 frames I got a large piece of steel channel that was holding up a giant gas heater in an old building nearby,the workers were going to throw it away but I snagged it !!! I used 4 bolts and 2 thick steel plates to connect it. I also bolted the forks from the rear frame to the dropouts of the front frame. I then used a fork that attached to the front frames seatpost clamp.At the rear I used a handlebar stem with the top cut off,slid that inside the fork and drilled a hole through the headtube AND fork of the rear frame. This actually came out very solid !!!! I then added a 6 gear freewheel and appropriate chains and deraileurs,plus a couple of hacked chainguards. It worked suprisingly well in this configuration !!!! Later on I used 2 adaptor spindles and moved the front chain to the left side so I could use both chainrings on the rear cranks=12-speed !!!! I also added 2 more brakes AND 2 more brake levers. The front two were controlled by the front rider and the rear ones by the rear rider !!! We used this bike everyday for a long time until my wife bought a small econo-car. It's cold and rainy around here most of the year,she didn't want to deal with that. Anyway the BANANDEM served us well when we needed it and it was a fun and interesting project for me (no more attention from the coppers !!! ). I learned a lot from that build that I used in later projects. I had to take it apart because of lack of storage space. Once we move into a place with a garage I plan on welding together a similar ride. I have 2 20" girls curvy hi-rise frames that have the 3 piece bottom brackets. Using those along with some crafty,artsy reinforcing in strategic areas THE BANANDEM WILL BE REBORN !!!! Any questions,comments,criticisms ( positive or negative ), E-mail me at omahgarsh@gmail.com I'd love to hear what you have to say !!!!!!!!

Wednesday, November 18, 2009

BLUE BELLE UPDATE !!! OL' BLUE GETS A NEW PAIR o' SHOES !!!!!

Yep,I went and done it !!! I put wheeldiscs on Bluebelle. I had been trying to decide whether or not to do this for quite some time. I thought it might take away from the 40's/50's styling,but I think it actually enhances it in an odd sort of way. The black on white goes great with the whitewalls and other white accents,seems to actually brighten up an already highly visible bike. I think the old girl looks better than ever !!!!!!!!! For a step by step HOW-TO article on these wheeldiscs please see my september posts. YOU LIKEY ?? YOU MAKEY !!!!!!! Any questions,comments,criticisms ( positive or negative ),E-mail me at omahgarsh@gmail.com I'd love to hear what you have to say !!!!!!!


Friday, November 13, 2009

SURF WOODY PROJECT !!!!!!! PART C: FREAKBIKE/TALLBIKE HOW-TO BUILD IT !!!!!


Okay folks, it's time for part C, I will be showing you how to get your seat situated properly AND how to make a BIG ol' pointy SISSY bar !!!! STEP ONE-Grab the seat and seat post you want to use and put them on the bike.Now adjust the seat height. Yer probably thinkin' " how can I do dat without sittin' on it !! ". Here's HOW !!!! I have other bikes that have banana seats that are already adjusted to fit me,maybe you do too !!! I discovered that when measuring from the center of the bottom bracket to the hole in the seat where the sissy bar attaches, all of them came out to 29" !!!!! I also found out a way to do this with regular seats,just measure from the center of the bottom bracket to the bottom of your seat post clamp on your seat. Mine always came out to 24 1/2",see what I'm sayin' !!!!! These measurements are VERY important because you want to be comfortble riding the finished bike,with proper leg extension. So adjust your seat accordingly.STEP TWO-Now step back and look at the bike from the side. Does the back of the seat go past the center of the rear wheel ??? UH-OH !!!!!! Rule of thumb for ALL tallbike builds-ALWAYS MAKE SURE THE BACK OF THE SEAT IS AT OR IN FRONT OF THE CENTER OF THE REAR WHEEL !!!!!! If you don't address this problem while building,the finished bike will have a strong tendancy to tip over backwards,NOT GOOD !!! You wanna make a bike that is well balanced and a JOY to ride,NOT a barely rideable MONSTROSITY !!!!!!!!!!!! Some banana seats might be too long to use,this is why for this bike I am using a shorty seat from a kids 16" bike. STEP THREE- Remove your seat but leave the seat post, Find a pipe or chunk of frame tubing that fits over the seat post. Now while straddling the front of the bike,grab the pipe with both hands and gently pull it towards you.Make sure you pull it nice and straight !!!!!! Do this a little at a time,put your seat back on periodically to see where it is in relation to the center of the wheel. Once you have it in the right place move on to the next step. STEP FOUR-The sissy bar will be made from 3 pieces of 3/4" scrap electrical conduit,2 pieces of 3" long straight h-bar tubing,and 2 pieces of 4" long h-bar tubing.The handlebar tubing is used to strengthen the parts of the bar where the bolts are attached and to connect the 3 main pieces. Now measure from the rear axle to the sissy bar mounting hole in the seat. Add 1" to that figure.This will be your overall length for your side pieces. Cut 2 lengths of conduit to this size. Now take the 3" pieces of h-bar tubing ( the PINK chunks in the pictures ),cover the insides w/silicone and slide them over one end of each piece of conduit until they are flush. Now using a 1/4" drillbit drill holes near the top of the h-bar pieces and install bolts as shown. Next,measure 1 1/2" from the bottom and make a mark there. Using a hammer,flatten the tubing up to that mark. Next measure 3/4" from the bottom of the flat sections,make a mark there. Now ,using a 3/8" drillbit,drill holes at that mark.This is the bottom of your side pieces and will (for now ) be attached to the rear axle. STEP FIVE-Moving to the top of the side pieces,measure and mark at 2" AND 4". Cut the conduit off at the 2" mark. Now take the 4" pieces of h-bar tubing,coat the insides w/silicone,and slide them onto the conduit up tp the remaining mark. Now drill 1/4" holes near the bottom end of the h-bar pieces and attach bolts. STEP SIX- Now measure 1/4" down from the top and drill 1/4" holes making sure they are in line with the 3/8" holes on the other end. Install the completed side pieces,find some bolts that are long enough to attach the seat to these pieces. STEP SEVEN- Measure to see how high you want the sissy bar to be ABOVE the seat.Double that measurement and find a piece of conduit that length. Now bend that piece evenly in half. If you have access to a tubing bender,use that,if not just fold that puppy in half!!!! STEP EIGHT-Remove the bolts from the seat,put some silicone on the ends of your top piece,and slide both ends down into your side pieces. Using the existing holes as a guide,drill 1/4" holes through to the seat holes and re-attach the seat bolts.You may notice from the pictures that I redrilled the sissy bar mounting holes further back on the seat. This is to make is to make sure the back of yer BUTT is mostly resting on the seat NOT jammed up against the sissy bar !! Dat's VERY UNCOMFORTABLE !!!!! STEP NINE- You will now have to bend the top part of the sissy bar back at an angle. Grab the back of the seat and the top of the bar and slowly bend it back to the angle you want. Alrighty then,tighten everything down and yer DONE !!!! Check out that COOL LOOKIN' sissy bar you just made !!!!! I really dig the look of this style of sissy bar. It kinda looks like the type the Bay Area chopper builders were puttin' on there motorcycles back in the days when Sonny Barger was still a young feller !!!! Those were and still are some of the coolest things on wheels !!!!! Ed Roth did some great drawings of these bikes. I've got a little tip that might be helpful about adjusting banana seats. Yer butt rests in the lowest part of the dip in the seat. Understand what I'm sayin'!!!!! Adjust the nose of the seat up to move yer butt back,or adjust it down to move yer butt forward. If you adjust it too far down in the front you'll keep sliding towards the front while riding. That's REALLY uncomfortable AND annoying,just experiment with different adjustments until you find the right one for you. The first 2 photos in this post are of what the bike looked like after the steps in this part were finished. I removed all the paint ( READY TO RUST !!!!!!!!! ), put an extra bend in the sissy bar,AND put a longer upside down fork on the top frame.When building vehicles like this it is always best to make changes,or fix potential problems as you are building rather than afterward.Okay that's it for now,PART D will deal with making the backbone that ties the 2 frames together at the rear. Any questions,comments,critcisms ( positive or negative ) E-mail me at omahgarsh@gmail.com I'd love to hear what you have to say !!!!!!!!


Thursday, November 12, 2009

HOW TO ATTACH HANDLEBARS OR A STEERING WHEEL TO AN UPSIDE DOWN FORK !!!!!

In this post i will be showing you 2 ways to attach handlebars to a cut down upside down fork,and also the start of a way to build a new type of bike steering wheel. Please check out my previous post about steering couplers,and PART B of the SURF WOODY project tallbike. The first way is to take a pair of drop down bars ( steel OR aluminum ), and bend them so the ends are parallel. Then cut them in half with a pipe cutter.If you're using steel bars you can just push them into the fork tubes adjust them by rotating to where they feel comfy and weld them in place !!!! YES IT"S JUST THAT EASY !!!!!!! You can either sand them down and paint them,OR put some cool bar tape on them. If your using aluminum bars 
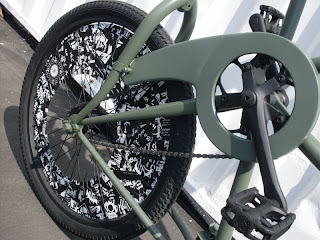
you will need to cut a 1/8" wide 1" long slot in the tops of the fork tubes and attach 2 appropriate sized seat post clamps.This is a good way to go because you can always adjust them later.The second way is to get a couple matching 22.2 bar stems ( I am using 2 mini 4 bolt BMX stems from some 16" parts bikes ). Make 2 split tubing spacers by finding some tubing that fits INSIDE the fork tubes and OUTSIDE the stems shaft.Tap the tubing down into the fork tubes as far as it will go,then mark it with tape as shown. Pull the tubing out and cut 2 pieces that length.Now cut a 1/8" slot along the length of both pieces. Now push the split tubing pieces ito the fork tubes,followed by the h-bar stems ( you may have to put the stems on the bars beforehand depending on what type of stems you're using ).There are several types of bars that will work here. Basically anything that has a wide,straight middle section,like inverted dropdown bars ,cruiser bars,or straight MTB bars,etc. When using anything other than the BMX 4 bolt stems you will have to use split tube spacers on the clamp part of the stems .Just cut a couple of pieces of tubing about a 1/4" wider than the clamp part of the stem and then cut them in half lengthwise to make it possible to slide them in place. These pieces could also be welded in place so the bars won't rotate when there is up or down pressure apllied to them while riding. Now adjust everything to a comfy position and tighten it all down and your done !!!! The steering wheel version will be covered later in a post for the SURF WOODY project,but you can get a good idea from the picture how it will go together.Any questions,comments,criticisms ( positive or negative ),E-mail me at omahgarsh@gmail.com I'd love to hear what you have to say !!!!!!!!


TALLBIKE STEERING COUPLERS !!!!!!!!! wutt da hekk izzat ??!!!!


Steering couplers are the things that connect the bottom frames fork to the top frames handlebars ( or steering wheel !!!! ) !!! Yep you gotta' control that front wheel REAL GOOD from way up there !!! Here are 3 different ways of doing just that. One is a weld together only method,the other 2 are bolt together style. The welded one is as shown on the big blue bike. This is done by welding a tube to the inside or outside of each frames headtubes.By doing this you create ONE VERY LONG HEADTUBE !!!!You then measure from the top of the top frames head tube to the bottom of the bottom frames head tube,add 1 1/4". Then slide a piece of tubing inside the fork,cut off the top part of another fork (THE TUBE THAT HAS THE THREADS ON IT ) ,then cut the tubing so that the 3 pieces are the same overall length ( plus the 1 1/4" )of the measurement you made on the head tube distance ( see drawing to clarify ).Remember to leave room for your handlebar stem to be installed at the top. Measure them up,clamp them in a piece of angle iron to keep them straight,and weld them up one side at a time.Let the welds cool before unclamping them so they stay straight.Also grind the welds so it will fit flush in the angle iron when welding the other side. Again let it cool before un clamping. You then assemble like a regular fork,it's just a WHOLE LOT LONGER !!!!!! This method looks the cleanest but has a couple of flaws. That long tube welded in the middle of the fork actually flexes when you hit a bump with the front wheel !!! This COULD cause the bearings near the bottom of the fork to wear out prematurely because they are rocking back and forth in a way they weren't designed to do.This method does work though, I have been riding the blue bike for years with no problems so far but it's not the best way to go.The following methods use ALL the bearings from BOTH headsets,MUCH BEEFIER !!!! NO MORE FLEXXO !!!!! The second setup is made from 2 identicle handle bar stems,a cut down pair of bars ( either drop down or 3-speed roadster type ),A frame seat post clamp,and 1 or 3 slotted spacer tubes ( depending on the type of stems you're using ). This type is shown on the two green bikes and the red one. First you find a fork that fits your top frame AND is able to fit a h-bar stem in the BOTTOM of the fork crown. I have been using forks from old Huffy 3 and 10 speeds for this because the hole in the bottom of the crown fits a 21.1 stem with no modification necessary ( another option here is to use an upside down fork,I'll show how to mount h-bars OR make a steering wheel out of it in my next post ). You then cut off the fork legs, mount BOTH stems and measure the distance between the centers of the handlebar mounting holes.Now you take the handlebar you're using and bend the ends ( THE PLACES WHERE YOUR HANDS GO) so they are parallel eachother. Now measure the distance between the centers of the h-bar TIPS.Subtract the distance from the other figure and then cut that much out of the center of the h-bar,GET IT !! You're cutting down the handlebar JUST ENOUGH so it will fit into the 2 stems. You're probably thinking "Yeah but it's cut in TWO !!". Okay to put the 2 halves BACK TOGETHER cut a 2" piece if tubing that is just the right diameter to slide over the h-bar tubing.Cut a 1/8" slot length wise into that.Slide both h-bar pieces into that and put the seat post clamp on and tighten it down. VOILA,you've got a solid cut down handlebar that fits between the 2 stems !!! Okay now if you're using BMX 4 bolt stems you can just bolt everything together now. If you're using regular stems you need to make 2 more split spacer tubes like the one you made to connect the 2 h-bar halves.The ends of the handlebars should be pushed in as far as possible.Then you can cut off the excess that is sticking out the other end.I also cap them off w/bar tape plugs.The third coupler type shown is the one I covered in PART B of my SURF WOODY project post. WHEN USING THE SEAT POST CLAMPS ALWAYS MAKE ABSOLUTELY CERTAIN THAT THE CLAMP IS TIGHTENING DOWN ON THE TUBING,NOT ON ITSELF !!!!! Use a smaller clamp to make sure all the pieces STAY TOGETHER !!!! Any questions,comments,criticisms ( positive or negative ),please e-mail me at omahgarsh@gmail.com I'd love to hear what you have to say!!!!